Top 10 Tools Needed for Safe Overhead Wiring Installations
Ever wondered what it takes to safely bring power from the utility pole to your home? Understanding the essentials for overhead service wiring is crucial, whether you're planning an upgrade, troubleshooting an issue, or simply want to be a more informed homeowner. Working with electricity, especially at the heights involved with overhead lines, demands respect and the right equipment.
Overhead wiring, often referred to as the service drop, is the lifeline that connects your home to the electrical grid. It's responsible for delivering the power that runs everything from your lights and appliances to your HVAC system. Because it's exposed to the elements, it's susceptible to damage from weather, falling branches, and even age. Knowing how to safely inspect, maintain, and, when necessary, repair this wiring is a key part of responsible homeownership.Remember, any work on your home electrical service drop should be handled by a qualified and licensed electrician unless you possess the proper certifications and experience. This article is for informational purposes only and not a substitute for professional electrical work.
Essential Tools for Overhead Electrical Work
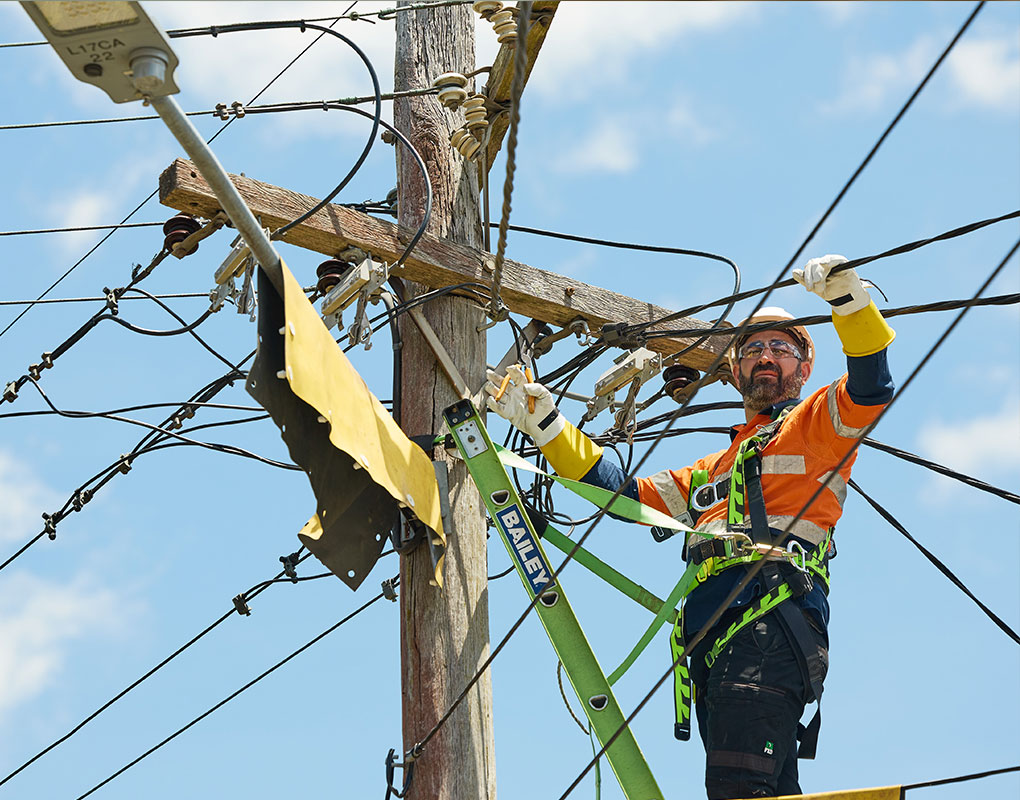
When tackling tasks related to your home's overhead electrical service, having the proper tools isn't just about convenience; it's about safety. Here's a rundown of ten essential tools that any electrician (or experienced DIYer who understands the risks) should have when working with residential overhead lines:
1.Voltage Tester (Non-Contact): This is your first line of defense. Before touching any wires, a non-contact voltage tester will tell you if a wire is live. It's a simple and crucial step to prevent electrical shock. Cost: $20 - $50.
2.Insulated Screwdrivers: Look for screwdrivers specifically rated for electrical work, usually marked with a voltage rating (e.g., 1000V). These prevent you from becoming a path to ground. A variety of sizes (Phillips and flathead) will be necessary. Cost: $30 - $75 for a set.
3.Insulated Pliers: Similar to screwdrivers, insulated pliers provide a safe grip when handling wires. Needle-nose pliers are useful for tight spaces, while lineman's pliers are great for cutting and twisting wires. Diagonal cutting pliers (dikes) are essential for cutting wire cleanly. Cost: $25 - $60 per pair.
4.Wire Strippers: These tools are designed to remove the insulation from wires without damaging the conductor itself. Using the correct gauge setting ensures a clean and safe connection. Automatic wire strippers can be a time-saver. Cost: $20 - $50.
5.Crimping Tool: For secure wire connections, a crimping tool is indispensable. It compresses connectors onto wires, creating a strong and reliable bond. Choose a crimper that's compatible with the types of connectors you'll be using. Cost: $30 - $80.
6.Lineman's Gloves (Rated for High Voltage): These heavy-duty rubber gloves are designed to protect you from high-voltage shocks. Always inspect them for tears or punctures before each use. Proper fit is critical. Cost: $50 - $150 (requires testing and certification).
7.Safety Glasses: Protecting your eyes from flying debris is essential. Safety glasses should fit snugly and provide adequate coverage. Cost: $10 - $30.
8.Hard Hat: When working at heights near overhead lines, a hard hat is non-negotiable. It protects you from falling objects, including tools, branches, or even components of the electrical system. Cost: $20 - $50.
9.Fiberglass Ladder (Rated for Electrical Work): Avoid using metal ladders near electrical lines. Fiberglass ladders are non-conductive and provide a much safer working platform. Ensure the ladder is rated for the weight you'll be placing on it. Cost: $100 - $300+.
10.Cable Cutter: For cleanly cutting larger gauge wires commonly found in service drops, a dedicated cable cutter provides leverage and precision that smaller pliers can't match. Cost: $40 - $100.
Understanding Overhead Service Drop Issues
Several factors can contribute to problems with your overhead wiring. Age, weather, and physical damage are the most common culprits.
Sagging Wires: Over time, the weight of the wire, combined with temperature fluctuations, can cause the service drop to sag. Excessive sagging can create a safety hazard and should be addressed promptly.
Damaged Insulation: Exposure to sunlight, rain, and wind can degrade the insulation on overhead wires. Cracked or brittle insulation increases the risk of short circuits and electrical shocks.
Tree Contact: Branches rubbing against the wires can wear down the insulation and even break the wires. Regular tree trimming is essential to prevent this.
Loose Connections: At the point where the service drop connects to your home and the utility pole, connections can loosen over time, leading to voltage drops and potential fire hazards.
How to Inspect Your Overhead Wiring (Visually - From a Safe Distance)
While you should never attempt to handle overhead wiring yourself, you can perform a visual inspection from a safe distance. Look for the following: Excessive Sag: Is the wire hanging significantly lower than it used to? Visible Damage: Can you see any cracks, breaks, or exposed wires? Tree Contact: Are any branches touching or rubbing against the wires? Corrosion: Do you see any signs of rust or corrosion at the connection points?
If you notice any of these issues, contact a qualified electrician immediately. Do not attempt to fix the problem yourself.
Safety First: Working Around Overhead Lines
Working with or near overhead lines is extremely dangerous. Electricity can arc, meaning it can jump from a wire to a nearby object or person without direct contact. This is why maintaining a safe distance is crucial. Here are some vital safety precautions: Always assume wires are live. Never touch or approach a wire without verifying that it is de-energized. Maintain a minimum clearance of 10 feet from all overhead lines. This applies to yourself, your tools, and any equipment you're using. Never use metal ladders or tools near overhead lines. Wear appropriate personal protective equipment (PPE), including lineman's gloves, safety glasses, and a hard hat. Work in dry conditions. Water conducts electricity, so avoid working near overhead lines when it's raining or damp. If you're unsure about anything, stop and consult a qualified electrician.
Understanding Voltage Levels
The voltage carried by overhead service drops is typically 240 volts, which is significantly higher than the 120 volts found in most household outlets. This voltage is more than enough to cause serious injury or death. Never underestimate the power of electricity.
Troubleshooting Common Issues
While most troubleshooting involving overhead wiring should be left to professionals, understanding potential problems can help you identify when to call for help.
Flickering Lights:Could indicate a loose connection in the service drop or a problem with the utility's equipment.
Power Outages: Can be caused by a damaged service drop, a blown transformer, or a problem with the utility's grid.
Low Voltage: Might be due to a sagging service drop or a corroded connection.
Important: If you experience any of these issues, contact your local utility company or a qualified electrician. Do not attempt to diagnose or repair the problem yourself.
People Also Ask (FAQ)
What does it cost to replace an overhead service drop?
The cost of replacing an overhead service drop can vary depending on several factors, including the length of the wire, the complexity of the installation, and your location. Generally, you can expect to pay anywhere from $500 to $2,000 or more. Get multiple quotes from licensed electricians to ensure you're getting a fair price.
How often should I inspect my overhead wiring?
A visual inspection of your overhead wiring should be performed at least once a year, preferably in the spring or fall. If you live in an area prone to severe weather, you may want to inspect it more frequently.
Can I bury my overhead service drop?
Yes, in many cases, you can bury your overhead service drop. This can improve the aesthetics of your property and reduce the risk of damage from weather or falling trees. However, burying a service drop requires careful planning and adherence to local codes. Consult with a qualified electrician and your local utility company to determine the feasibility and cost of burying your service drop.
Choosing the Right Tools and Equipment
When purchasing tools for electrical work, quality matters. Invest in reputable brands that are known for their safety and reliability. Look for tools that are clearly marked with voltage ratings and that meet or exceed industry standards. Don't skimp on safety equipment. Lineman's gloves, safety glasses, and a hard hat are essential for protecting yourself from electrical hazards.
Maintaining Your Tools
Proper maintenance of your tools is essential for ensuring their safety and longevity. Clean your tools regularly and inspect them for damage. Replace any tools that are worn or damaged. Store your tools in a dry place to prevent rust and corrosion. Regularly inspect your lineman's gloves for punctures or tears, and have them tested periodically by a qualified testing facility.
Conclusion: Taking Control of Your Home's Electrical Health
Understanding the basics of overhead wiring and having the right tools on hand (or knowing who to call whodoes) empowers you to be a more informed and proactive homeowner. Remember, safety should always be your top priority. While this guide provides valuable information, it's not a substitute for professional training and experience. If you're unsure about anything, consult a qualified electrician. By taking the necessary precautions and staying informed, you can ensure the safety and reliability of your home's electrical system for years to come.
Posting Komentar untuk "Top 10 Tools Needed for Safe Overhead Wiring Installations"